Azure Blockchain platform have some pretty cool solutions to create consortium blockchain solutions. In this walkthrough we are going to demonstrate one step by step guideline for setting up a Quorum demo environment including, configuring the environment and deploy the first applications on top. Quorum is an extension / fork of Ethereum for consortium scenarios, including two useful extensions:
- increased performance with a Proof of Authority algorithm
- private and confidential transactions
- node privacy
- increased performance with a Proof of Authority algorithm
- private and confidential transactions
- node privacy
1. Choosing the necessary Azure Blockchain template: Azure Blockchain has many different templates. Two of them are important for Quorum consortium blockchains: with the help of "Quorum Single Member Blockchain Network" you can create a minimal infrastructure, with "Quorum Demo" a preconfigured demo environment is delivered.

2. Delivering Infrastructure: In this tutorial we deliver the "Quorum Demo" template. It requires the configuration of a standard Azure image with the usual virtual machine sizing parameters. All blockchain specific installation step will be configured in the post configuration.

3. Post configuration of the infrastructure:
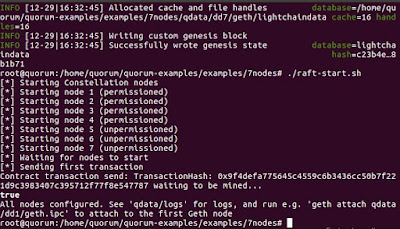
If you see the following screen, the Quorum demo started successfully.
Optionally, before starting the nodes it might be a good idea to pre-allocate some ether. The 7nodes demo uses the genesis.json genesis file. You can pre-allocate ether to the coinbase address with the following command:
4. To test if things working you can attach to the nodes with the help of the Geth console and make further configuration if necessary (make sure that you are in the 7nodes demo folder, if you get permission denied error message use sudo at the beginning, if the ipc file is not found than there was probably an error in the previous step at setting up the network):
geth attach ipc:qdata/dd1/geth.ipc
Optionally, after attachment it might be a good idea to distribute some of the preallocated ether, with the following command:
eth.sendTransaction({from:"0xed9d02e382b34818e88b88a309c7fe71e65f419d",to:"<to_address>", value: 100000000})
5. Testing a pre-deployed private contract: with the 7nodes demo scenario, there is a private contract, called simple storage that has already been deployed at the setting up of the network, you can test as starting two windows and attaching to the node 1 and node 4:
geth attach ipc:qdata/dd1/geth.ipc
geth attach ipc:qdata/dd4/geth.ipc
then configuring the contract
var address = "0x1932c48b2bf8102ba33b4a6b545c32236e342f34";
then calling get function should deliver 42 on node 1 and 0 on node 4:
private.get()
6. Configure Truffle: Truffle must be configured to the environment with a custom network configuration that can be set in truffle.js. It is important to set the public address to the public address of the virtual machine and configure the 22000 (Quorum rpc port to be open):

If you configured correctly, you should be able to start a migration with Truffle. There might be some issues however, as an example, if you Truffle deployment will remain hanging in some scenarios. The reason for that is that the development javascript expects that the transaction was actually mined. As however in Quorum there is no mining, the process might stay hanging. One workaround is to use only one javascript deployment script and based on the transaction hashes check explicitly if the given transaction was correctly validated. Another workaround that sometimes work is to start the Truffle console explicit on a given node and execute the migration from there. And last but not least, do not forget to open the 22000 - 22008 ports on the Azure environment.
7. Configuring metamask with Quorum: configuring metamask with quorum is pretty similar to configuring another given network via the Custom RPC of Metamask. Simply use the IP address and the port with http:
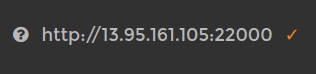

Figure 1. Quorum Azure templates
2. Delivering Infrastructure: In this tutorial we deliver the "Quorum Demo" template. It requires the configuration of a standard Azure image with the usual virtual machine sizing parameters. All blockchain specific installation step will be configured in the post configuration.

Figure 2. Setting up Quorum demo infrastructure
ssh <user>@<ip> -- logging in into the environment
git clone https://github.com/jpmorganchase/quorum-examples.git -- cloning the repo
cd quorum-examples/examples/7nodes -- the 7 nodes demo
sudo su -- changing to root
./raft-init.sh -- initialising the environment (you have to probably use sudo)
./raft-start.sh -- starting the environment (you have to probably use sudo)
If you see the following screen, the Quorum demo started successfully.

Figure 3. Quorum demo started successfully
Optionally, before starting the nodes it might be a good idea to pre-allocate some ether. The 7nodes demo uses the genesis.json genesis file. You can pre-allocate ether to the coinbase address with the following command:
"alloc":
{"0xed9d02e382b34818e88b88a309c7fe71e65f419d": {"balance":
"111111111"}}
geth attach ipc:qdata/dd1/geth.ipc
Optionally, after attachment it might be a good idea to distribute some of the preallocated ether, with the following command:
eth.sendTransaction({from:"0xed9d02e382b34818e88b88a309c7fe71e65f419d",to:"<to_address>", value: 100000000})
geth attach ipc:qdata/dd1/geth.ipc
geth attach ipc:qdata/dd4/geth.ipc
var address = "0x1932c48b2bf8102ba33b4a6b545c32236e342f34";
var abi = [{"constant":true,"inputs":[],"name":"storedData","outputs":[{"name":"","type":"uint256"}],"payable":false,"type":"function"},{"constant":false,"inputs":[{"name":"x","type":"uint256"}],"name":"set","outputs":[],"payable":false,"type":"function"},{"constant":true,"inputs":[],"name":"get","outputs":[{"name":"retVal","type":"uint256"}],"payable":false,"type":"function"},{"inputs":[{"name":"initVal","type":"uint256"}],"type":"constructor"}];
var private = eth.contract(abi).at(address)
private.get()

Figure 4. Live (Quorum Azure) network configuration
You can use the following command for migration:
truffle migrate --network live --verbose-rp
truffle migrate --network live --verbose-rp
If you configured correctly, you should be able to start a migration with Truffle. There might be some issues however, as an example, if you Truffle deployment will remain hanging in some scenarios. The reason for that is that the development javascript expects that the transaction was actually mined. As however in Quorum there is no mining, the process might stay hanging. One workaround is to use only one javascript deployment script and based on the transaction hashes check explicitly if the given transaction was correctly validated. Another workaround that sometimes work is to start the Truffle console explicit on a given node and execute the migration from there. And last but not least, do not forget to open the 22000 - 22008 ports on the Azure environment.
7. Configuring metamask with Quorum: configuring metamask with quorum is pretty similar to configuring another given network via the Custom RPC of Metamask. Simply use the IP address and the port with http:
Figure 5. Metamask configuration for Quorum